MapR Distributed Deep Learning QSS is to combining enterprise ready distributed file system with Kubernetes, to train and deploy deep learning models distributedly on a heterogeneous GPU cluster. We will demonstrate the steps to deploy Distributed Deep Learning QSS on MapR converge data platform. On AWS cloud, we set up 3 g2.2xlarge nodes as GPU nodes and 1 m4.2xlarge as master node. We used Ubuntu 16.04 here, but it will work as well on Redhat and CentOS.
Install MapR on CPU and GPU nodes
First, we install MapR on the cluster. For simplicity, we put all MapR services on the master node, and leave the GPU for computing.
#set up clustershell and passwordless ssh

apt-get install -y clustershell screen
vi /etc/clustershell/groups
all: ip-10-0-0-[226,75,189,121].ec2.internal
cldb: ip-10-0-0-226.ec2.internal
zk: ip-10-0-0-226.ec2.internal
web: ip-10-0-0-226.ec2.internal
nfs: ip-10-0-0-[226,75,189,121].ec2.internal
gpu: ip-10-0-0-[75,189,121].ec2.internal
ssh-keygen -t rsa
for i in ip-10-0-0-226.ec2.internal ip-10-0-0-75.ec2.internal ip-10-0-0-189.ec2.internal ip-10-0-0-121.ec2.internal; do ssh -i /home/ubuntu/mapr-dm.pem $i; done
cat ~/.ssh/id_rsa.pub | ssh -i /home/ubuntu/mapr-dm.pem root@ip-10-0-0-226.ec2.internal 'cat >> .ssh/authorized_keys'
cat ~/.ssh/id_rsa.pub | ssh -i /home/ubuntu/mapr-dm.pem root@ip-10-0-0-75.ec2.internal 'cat >> .ssh/authorized_keys'
cat ~/.ssh/id_rsa.pub | ssh -i /home/ubuntu/mapr-dm.pem root@ip-10-0-0-189.ec2.internal 'cat >> .ssh/authorized_keys'
cat ~/.ssh/id_rsa.pub | ssh -i /home/ubuntu/mapr-dm.pem root@ip-10-0-0-121.ec2.internal 'cat >> .ssh/authorized_keys'

#start to install MapR
clush -a 'apt-get update -y'
clush -a 'apt-get install -y  openjdk-8-jdk'
clush -a "echo never > /sys/kernel/mm/transparent_hugepage/defrag"
clush -a "cat >> /etc/security/limits.conf << EOL
mapr soft nofile 64000
mapr hard nofile 64000
mapr soft nproc 64000
mapr hard nproc 64000
EOL"
clush -a "groupadd -g 5000 mapr"
clush -a "useradd -g 5000 -u 5000 mapr"
passwd mapr

clush -a " wget -O - http://package.mapr.com/releases/pub/maprgpg.key | sudo apt-key add -"
clush -a "cat >>  /etc/apt/sources.list << EOL
deb http://package.mapr.com/releases/v5.2.1/ubuntu binary trusty
deb http://package.mapr.com/releases/MEP/MEP-3.0/ubuntu binary trusty
EOL"

clush -a 'fdisk -l'
clush -a "cat >> /root/disks.txt << EOL
/dev/xvde
/dev/xvdc
/dev/xvdd
EOL"

clush -a apt-get update -y
clush -g zk apt-get install -y mapr-cldb mapr-zookeeper mapr-webserver
clush -a apt-get install -y mapr-core mapr-fileserver mapr-nfs
clush -a /opt/mapr/server/configure.sh -C `nodeset -S, -e @cldb` -Z `nodeset -S, -e @zk` -N DLcluster -M7 -no-autostart
clush -a "ls /root/disks.txt && /opt/mapr/server/disksetup -F /root/disks.txt"
#make sure the folder is here
clush -a sed -i "'s/#export JAVA_HOME=/export JAVA_HOME=\/usr\/lib\/jvm\/java-1.8.0-openjdk-amd64\/jre/g' /opt/mapr/conf/env.sh"
clush -a mkdir -p /mapr
clush -a 'echo "localhost:/mapr  /mapr  hard,nolock" > /opt/mapr/conf/mapr_fstab'

clush -a systemctl start rpcbind
sleep 2
clush -g zk systemctl start mapr-zookeeper
sleep 10
clush -g zk systemctl status mapr-zookeeper
clush -a systemctl start mapr-warden
maprcli node cldbmaster
now register the cluster
clush -a 'mount -o hard,nolock localhost:/mapr /mapr'
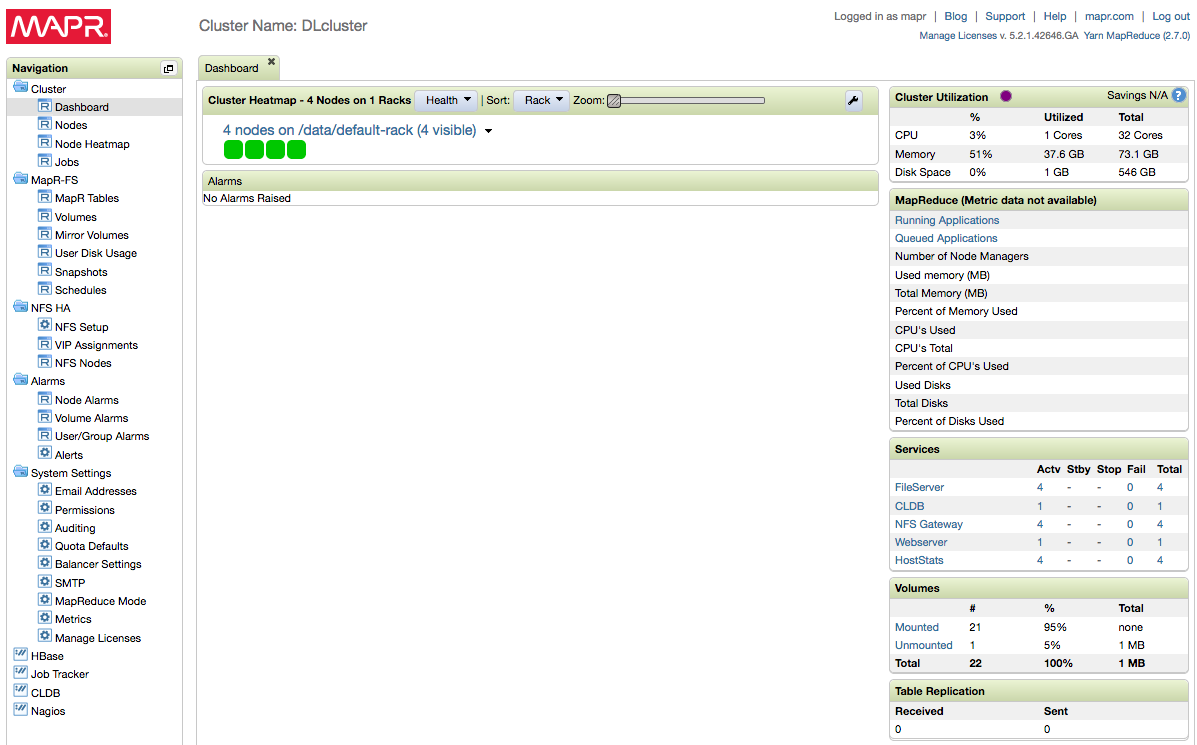
Before mount the disk you might want to register your cluster and apply enterprise trial license, then restart the NFS on each node, you can do that through MCS web interface. To register the cluster: https://community.mapr.com/docs/DOC-1679
At this step, you should have a running MapR cluster, since we didn’t install any ecosystem components, it should be fairly simple and basic. If /mapr folder is not mounted to mapr file system, run “clush -a 'mount -o hard,nolock localhost:/mapr /mapr’”. Also, we should set mapr subnet in /opt/mapr/conf/env.sh, add “export MAPR_SUBNETS=10.0.0.0/24”.
Install Kubernetes 1.7
Now want to install kubernetes master on the CPU node, workers on the GPU nodes. With Kubernetes 1.5.2 and earlier, there are manual procedures. For Kubernetes 1.6 and later, we will use Kubeadm to config and spin up the cluster.
clush -a apt-get update && apt-get install -qy docker.io
clush -a apt-get update && apt-get install -y apt-transport-https
clush -a 'curl -s https://packages.cloud.google.com/apt/doc/apt-key.gpg | apt-key add -'
cat >> /etc/apt/sources.list.d/kubernetes.list << EOL
deb http://apt.kubernetes.io/ kubernetes-xenial main
EOF
clush -a apt-get update
clush -a "apt-get install -y kubelet kubeadm kubectl kubernetes-cni"

cat >> /etc/systemd/system/kubelet.service.d/10-kubeadm.conf << EOL
Environment="KUBELET_EXTRA_ARGS=--feature-gates=Accelerators=true"
EOL
clush -a "systemctl enable docker && systemctl start docker"
clush -a "systemctl enable kubelet && systemctl start kubelet"

kubeadm init --pod-network-cidr=10.244.0.0/16  --apiserver-advertise-address=10.0.0.226
cp /etc/kubernetes/admin.conf $HOME/
sudo chown $(id -u):$(id -g) $HOME/admin.conf
export KUBECONFIG=$HOME/admin.conf
echo "export KUBECONFIG=$HOME/admin.conf" | tee -a ~/.bashrc

kubectl apply -f https://raw.githubusercontent.com/coreos/flannel/master/Documentation/kube-flannel-rbac.yml
kubectl create -f https://raw.githubusercontent.com/coreos/flannel/master/Documentation/kube-flannel.yml
kubectl taint nodes --all node-role.kubernetes.io/master-
kubeadm join --token c44f75.d6a7a3d68d638b50 10.0.0.226:6443
export KUBECONFIG=/etc/kubernetes/kubelet.conf

kubectl create -f https://git.io/kube-dashboard
kubectl proxy --port=8005
Then on your local machine, use ssh tunnel to access the kubernetes dashboard with:
ssh -N -L 8005:127.0.0.1:8005 UbuntuK

Host UbuntuK
    HostName ip-10-0-0-226.ec2.internal
    User ubuntu
    Port 22
    IdentityFile ~/Documents/AWS/mapr-dm.pem
Then go to http://localhost:8005/ui to access the dashboard.
Install Nvidia Libraries
Then, to enable deep learning applications, we need to install Nvidia driver with Cuda and Cudnn on all the gpu nodes. The driver version will be different given the GPU cards in use.
clush -g gpu 'apt-get -y install build-essential cmake g++'
clush -g gpu "cat >> /etc/modprobe.d/blacklist-nouveau.conf << EOL
blacklist nouveau
options nouveau modeset=0
EOL"
clush -g gpu update-initramfs -u
on each node
wget https://developer.nvidia.com/compute/cuda/8.0/Prod2/local_installers/cuda_8.0.61_375.26_linux-run
wget http://us.download.nvidia.com/XFree86/Linux-x86_64/367.57/NVIDIA-Linux-x86_64-367.57.run
wget https://developer.nvidia.com/compute/machine-learning/cudnn/secure/v5.1/prod_20161129/8.0/cudnn-8.0-linux-x64-v5.1-tgz
tar -xvf cudnn-8.0-linux-x64-v6.0.tgz -C /usr/local
cp /usr/local/cuda/lib64/libcudnn* /usr/local/cuda-8.0/lib64/.
bash run the two run files
clush -a "cat >> /root/nvidiastartscript.sh << EOL
#!/bin/bash
/sbin/modprobe nvidia
if [ "$?" -eq 0 ]; then
# Count the number of NVIDIA controllers found.
NVDEVS=`lspci | grep -i NVIDIA`
N3D=`echo "$NVDEVS" | grep "3D controller" | wc -l`
NVGA=`echo "$NVDEVS" | grep "VGA compatible controller" | wc -l`
N=`expr $N3D + $NVGA - 1`
for i in `seq 0 $N`; do
mknod -m 666 /dev/nvidia$i c 195 $i
done
mknod -m 666 /dev/nvidiactl c 195 255
else
exit 1
fi
/sbin/modprobe nvidia-uvm
if [ "$?" -eq 0 ]; then
D=`grep nvidia-uvm /proc/devices | awk '{print $1}'`
mknod -m 666 /dev/nvidia-uvm c $D 0
else
exit 1
fi
EOL"
Execute this bash script on the GPU nodes to set up the nvidia devices.
export PATH=/usr/local/cuda-8.0/bin${PATH:+:${PATH}}
export LD_LIBRARY_PATH=/usr/local/cuda-8.0/lib64${LD_LIBRARY_PATH:+:${LD_LIBRARY_PATH}}
nvidia-smi should give you the GPU info, and we use that info to label the kubernetes nodes.
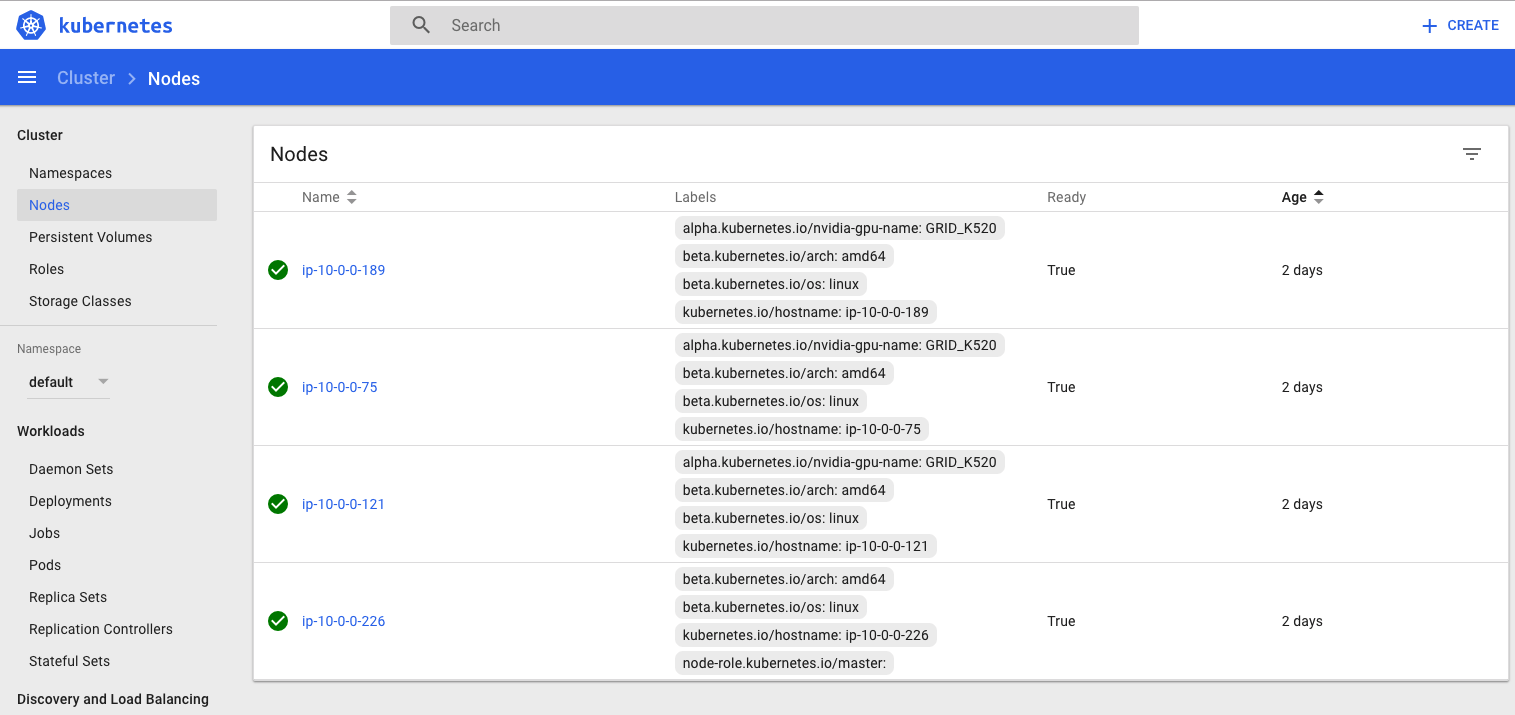
kubectl label nodes ip-10-0-0-189 alpha.kubernetes.io/nvidia-gpu-name=GRID_K520
kubectl label nodes ip-10-0-0-75 alpha.kubernetes.io/nvidia-gpu-name=GRID_K520
kubectl label nodes ip-10-0-0-121 alpha.kubernetes.io/nvidia-gpu-name=GRID_K520
At this point, we have set up our running GPU cluster with MapR and Kubernetes 1.7.
If we use kubectl to describe the nodes, we should be able to see the gpu capacity under different nodes.
for cpu nodes: kubectl describe node ip-10-0-0-226:
Capacity:
 alpha.kubernetes.io/nvidia-gpu:        0
 cpu:                                   8
 memory:                                32946584Ki
 pods:                                  110
Allocatable:
 alpha.kubernetes.io/nvidia-gpu:        0
 cpu:                                   8
 memory:                                32844184Ki
 pods:                                  110

for gpu nodes: kubectl describe node ip-10-0-0-75:
Capacity:
 alpha.kubernetes.io/nvidia-gpu:        1
 cpu:                                   8
 memory:                                15399284Ki
 pods:                                  110
Allocatable:
 alpha.kubernetes.io/nvidia-gpu:        1
 cpu:                                   8
 memory:                                15296884Ki
 pods:                                  110
To summarize, we have installed a MapR MFS only cluster to provide the distributed data layer and installed Kubernetes 1.7 as the orchestration layer. We enabled Kubernetes to manage the GPU, CPU and memory resources on each node in cluster. In the next blog, we will configure the persistent storage to link MapR file systems with kubernetes pods and demonstrate simple distributed deep learning training examples.